This post is aimed at lecturers with little experience of educational design for online teaching, who are thinking about how to teach online next term. Perhaps you made it through the first rush of the pandemic with what you had to hand, and you’ll have a little more time to think about the next iteration.
I posted this elsewhere, so it isn’t really aimed at lecturers who are partnering with us on online programmes (where we guide you through a beefed up version of something similar to this) but I hope it’s useful to some readers.
This is a practical distillation of advice I give about planning your online module, stripped right down to basics.
It’s not the only way to do it, but it’s a workable way to do it. You can do it on your own, and it will save you time later on.
The first thing to do is: STOP!
You’ve got your slides, readings, lecture notes, you have your syllabus, you have an empty or half-formed VLE area for your module, you have some discussion board threads which could be beefed up… maybe you have Adobe Presenter or you’ve had training in how to narrate your slides in other software, or you even have recordings of your lectures.
Put them all to one side.
Jumping straight in to content production is the single biggest mistake that people make — it will result in a lot of unnecessary work later on, and probably lead to a dull module.
Instead, give this planning technique a chance. It may take you most of a day, it may take only a couple of hours. I guarantee that it will save you many multiples of the time you spend doing it, and your module will be better for it.
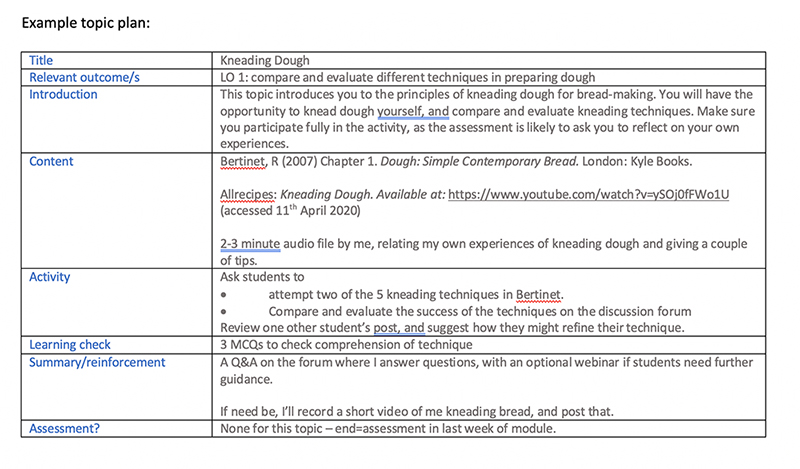
I’ve made a template you can use as you follow the steps below (Word). It includes an example topic plan. It’s this simple:
Here are the steps, first for the module-level information you’ll need, and then for planning each topic. I give a short description of what to do for each step, below the list.
Steps for module-level information…
1. Gather your learning outcomes
2. Write a module introduction
3. Write down the module assessment/s
4. Write down weekly topics
- Gather your learning outcomes
If your learning outcomes are well formed, each one will have a main verb. These verbs will tell students what you think they should be able to do as a result of studying successfully on your module.
The verbs will be things like ‘analyse’, ‘produce’, ‘predict’, ‘identify’, ‘understand’, ‘describe’, ‘devise’, ‘develop’, ‘evaluate’.
These verbs are going to be your guide rope for planning your module. They will inform your content, your learning activities and your assessment, if you control it. Write them down and pin them to your board, or stick them on a note on your screen.
(You can spot if your outcomes are not well formed by the prevalence of particular verbs which don’t ask much of your students. If the word ‘understand’ keeps appearing, start again and simply write down, in plain language, what you want your students to be able to do. ‘Understand’ doesn’t ask your students to do anything).
2. Write a module introduction
In one paragraph, tell your students why this module is useful to them. Tell them in your own words what they will learn and what they will be able to do by the end. You might even bring in your own experience here or relate it to your own research, if relevant. Address them directly, make it sound like your voice.
(Later, you might record this as video or audio, or it may remain as text. But writing it down is the important thing, and it helps to crystallise your thoughts.)
3. Write down the module assessment/s
The assessment is probably already set (see your module specification or syllabus document). It may be a single end-assessment, or comprised of more than one piece of work. Write it down, and make a note to yourself about whether it really does measure those learning outcomes you wrote down in step 1 (it should).
4. Arrange your module into topics.
You probably have this already, if your module follows a weekly structure. Give each topic a name. This is like a chapter heading.
Now, you can move on to the meat of the task, which is planning your topics.
Steps for planning each topic:
- Write down the name of the topic.
- Note the module\s learning outcomes relevant to the topic.
- Write a short topic introduction of 2-3 sentences.
- Devise a suitable learning activity.
- A post-activity learning check.
- Summary/reinforcement.
- Content.
- Write down the name of the topic
Feel free to use the template I’ve made for the job.
2. Note the module\s learning outcomes relevant to the topic.
You may or may not make these explicit to your students, but it;s useful at each steps to use your outcomes as the guide rope for constructing your topic – all the content, activities and assessment/s should be in service of helping students to achieve these outcomes.
3. Write a short topic introduction of 2-3 sentences.
Write one sentence, direct to your students, telling them what the topic is about.
Then, write one more sentence to your students, using your learning outcomes as your raw material, telling them what they should be able to do once they have studied the topic successfully.
You might also want to foreshadow the assessment, by showing how the topic will be relevant to it.
(See the quick example on ‘kneading dough’ in the example above.
4. Devise a suitable learning activity
There are many ways to devise learning activities online. For a simple start, think of a learning activity that has two parts to it: the first part requires students to do something on their own, and the second part asks them to share the result of their activity with the peers, or to give each other feedback of some kind.
The point of the activity is that they have the chance to apply, practice, talk about the knowledge you are giving them, and not just sit at their screens listening/watching/reading.
5. Post-activity learning check
After completing an activity, students will likely find it useful to have a chance quickly to check their new knowledge. You could do this with a set of 3-5 quick multiple choice questions using your VLE/LMS’ quiz tool, or you could simply ask them to post a message summarising how they think the activity went for them. You could even ask them to keep a private log in a journal or note-making tool. At the very simplest, you could ask them to rate how well they think they performed.
(This easy step forces the student to reflect, however briefly, on their learning.)
6. Summary/reinforcement
Use the discussion tool to write a post at the end of the topic summarising what has been learned that week. You might want to pick out a couple of examples of student work, or provide a link to further resources around a particular point if students found it challenging. Ask students to post any last questions here; answer them yourself or ask other students to respond with clarifications. If you plan on having a live (or ‘synchronous’) element like a webinar, doing it here, at the end rather than the beginning of the module, can work well.
7. Content
Only now should you turn to the content. For students, this will be placed before the learning activity, but you should only gather it together at the end of the planning process. Why? Because by now you will have a diamond clear idea of what resources are going to be most useful in supporting students to achieve the topic’s learning outcomes. You have avoided content for content’s sake, and stripped out any detours which delay the student from getting from a to b.
Content may consist of readings, textbooks, multimedia stuff that you have or can link to, case studies, datasets, external web resources… the full range of things that you may want students to engage with, depending on your discipline and the subject at hand. Try to avoid PowerPoint slides. For the plan, just list the resources you think you will need, and make sure they are relevant to the learning outcome/s relevant to the topic.
… That’s it. Rinse and repeat for each topic, look back over the whole thing and tweak as necessary, and you will have a well plotted plan for your online module.
You may notice you end up making far less content than you might have done otherwise, or that you might do for a module on campus. That’s all to the good – online learning works best when you get students participating, and there is usually a wealth of resources out there in digital form you can use. Your value is not in the learning materials you make, but in the expertise with which you curate knowledge and guide students through.
The example I use in the template – kneading dough – is a straightforward skills-based activity. You may wonder if it works as well for the finer details of supply chain management, blockchain, or comparative world literature. At UoL, we make modules in all those subjects using a method not too different to the one given here. Feel free to give it a go.